 Modeling the Dual Rhomboid
In thinking about building a dual rhomboid, we should carefully evaluate whether the results will be worth the effort involved. Despite its inexpensiveness at UHF, the dual rhomboid is not the simplest antenna to build.
Moreover, the dual rhomboid does not offer in modeled performance the gain theoretically claimed for it. Consistent gain figures between 15 and 16 dBi free space have emerged from the models. Even if we allow that the models have not caught the precise dimensions by which the side lobes come in for complete control, it is dubious that any constructed version of the antenna will achieve much more than 16 dBi free-space gain.
Therefore, it is reasonable to look at some other antennas in order to make some evaluative comparisons. In this note, I shall explore only two: the single-wire rhombic and a standard Yagi.
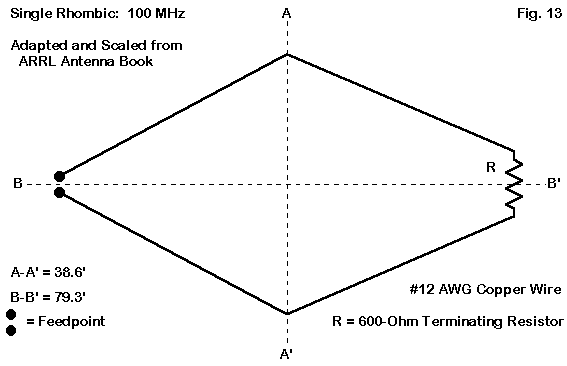
Fig. 13 provides the essential dimensions for the 100 MHz single-wire rhombic. At 79.3' long by 38.6' wide, the antenna occupies a footprint just a tad smaller than the dual rhomboids. The model description follows.
ARRL rhombic scaled to 100 MHz                  Frequency = 100  MHz.

Wire Loss: Copper -- Resistivity = 1.74E-08 ohm-m, Rel. Perm. = 1

              --------------- WIRES ---------------

Wire Conn.--- End 1 (x,y,z : ft)  Conn.--- End 2 (x,y,z : ft)  Dia(in) Segs

1   W6E2  -1.200,  0.000, 14.469  W2E1   1.200,  0.000, 14.469    # 12    7
2   W1E2   1.200,  0.000, 14.469  W3E1  19.291, 39.638, 14.469    # 12  100
3   W2E2  19.291, 39.638, 14.469  W4E1   0.344, 79.275, 14.469    # 12  100
4   W3E2   0.344, 79.275, 14.469  W5E1  -0.344, 79.275, 14.469    # 12    3
5   W4E2  -0.344, 79.275, 14.469  W6E1 -19.291, 39.638, 14.469    # 12  100
6   W5E2 -19.291, 39.638, 14.469  W1E1  -1.200,  0.000, 14.469    # 12  100

              -------------- SOURCES --------------

Source    Wire      Wire #/Pct From End 1    Ampl.(V, A)  Phase(Deg.)  Type
          Seg.     Actual      (Specified)
1           4     1 / 50.00   (  1 / 50.00)      0.707       0.000       V

              --------------- LOADS ---------------

Load      Wire      Wire #/Pct From End 1      R (Ohms)       X(Ohms)
          Seg.     Actual      (Specified)
1           2     4 / 50.00   (  4 / 50.00)     600.000         0.000

Ground type is Free Space
The values in the Z columns are remnants of the source of this scaled model and can be replaced by zeroes for free space analysis. The wide spacing of the wires near the feedpoint represent an attempt to control some of the capacitive reactance at the feedpoint.
As I did for the CATJ dual rhomboid models, I ran the scaled single-wire rhombic through various wire sizes to develop a sense of the trends in performance. Note the reduction of the terminating resistor to 600 Ohms from the HF value of 800 Ohms. Here are the results.
Wire      Dia.      Gain      F-B       B/W       F/S       Feed Z
Size      In.       dBi       dB        deg       dB        R+/-jX
12        0.0808    13.85     45.30     11.4       8.50     625 -  96
10        0.1019    13.93     34.76     11.4       8.53     606 - 105
 8        0.1285    14.01     29.84     11.4       8.56     585 - 114
 6        0.1620    14.09     26.68     11.4       8.59     563 - 122
 4        0.2043    14.16     24.40     11.4       8.61     540 - 130
 2        0.2576    14.24     22.57     11.4       8.65     516 - 137
Fig. 14 presents the free space azimuth pattern for the single-wire rhombic using #12 wire, where the terminating resistor has been optimized for maximum 180-degree front-to-back ratio. Obvious from the figure is the fact that a 180-degree front-to-back ratio reveals the rearward lobe behavior over only a very small portion of the rear quadrants. The number is impressive on paper only.
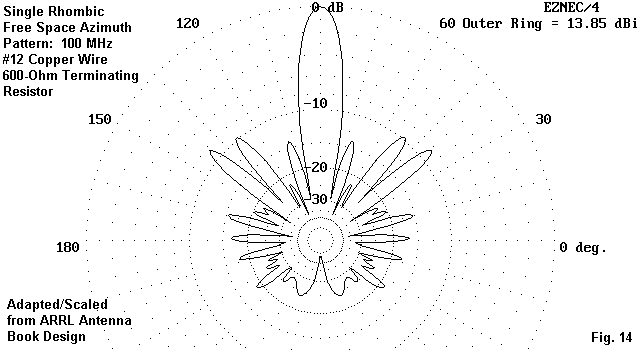
Optimizing the front-to-back ratio for wire sizes other that #12 AWG will require adjustment of the terminating resistor. Larger wire versions may be preferable to the #12 model in order to increase both the antenna gain and the front-to-side lobe ratio.
The front-to-side lobe ratio numbers can be misleading if one does not also account for the strength of the main lobe. In fact, the lower front-to-side lobe numbers for the single-wire rhombic--relative to the dual rhomboid models--only indicate lobes that have about the same intrinsic strength as those of the dual rhomboids. We can see this by overlaying patterns, as in Fig. 15.
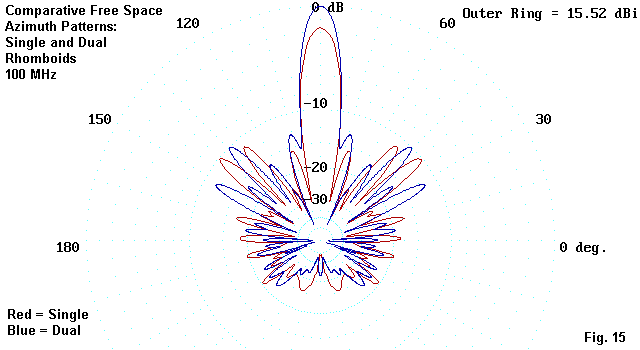
The red and blue patterns in Fig. 15 clearly show the higher gain of the dual rhomboid. However, with respect to the other lobes in the pattern, only the positions and not the strengths change from one pattern to the next. With respect to the secondary lobes, there is not much to choose between a single-wire rhombic and a dual rhomboid. Of course, this must be qualified with the recognition that the models in this collection may not have caught the precise dimensions that yield maximum lobe control. However, we have looked at enough models to suggest that if there is such a "perfect" dimension set, it is unlikely to be replicated in the home workshop.
In terms of forward gain, the difference between the best 100 MHz #12 wire dual rhomboid and the #12 wire single rhombic is less than 1.7 dB.
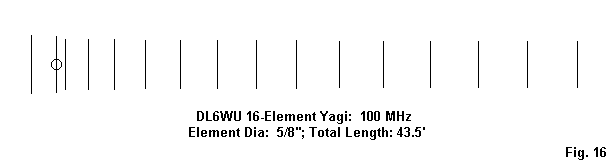
For this exercise, I cut off a 26 element DL6WU design at 16 elements and then scaled the result to 100 MHz to provide a comparator for the dual rhomboid. The antenna has the appearance of Fig. 16.
For reference, here is the model description.
DL6WU Original, 26 el 432 MHz             Frequency = 100  MHz.

Wire Loss: Aluminum -- Resistivity = 4E-08 ohm-m, Rel. Perm. = 1

              --------------- WIRES ---------------

Wire Conn.--- End 1 (x,y,z : ft)  Conn.--- End 2 (x,y,z : ft)  Dia(in) Segs

1          0.000,  2.414,  0.000         0.000, -2.414,  0.000 6.80E-01  19
2          1.967,  2.339,  0.000         1.967, -2.339,  0.000 6.80E-01  19
3          2.704,  2.137,  0.000         2.704, -2.137,  0.000 6.80E-01  19
4          4.476,  2.120,  0.000         4.476, -2.120,  0.000 6.80E-01  19
5          6.591,  2.095,  0.000         6.591, -2.095,  0.000 6.80E-01  19
6          9.048,  2.071,  0.000         9.048, -2.071,  0.000 6.80E-01  19
7         11.803,  2.049,  0.000        11.803, -2.049,  0.000 6.80E-01  19
8         14.753,  2.030,  0.000        14.753, -2.030,  0.000 6.80E-01  19
9         17.851,  2.014,  0.000        17.851, -2.014,  0.000 6.80E-01  19
10        21.098,  2.000,  0.000        21.098, -2.000,  0.000 6.80E-01  19
11        24.491,  1.987,  0.000        24.491, -1.987,  0.000 6.80E-01  19
12        28.032,  1.976,  0.000        28.032, -1.976,  0.000 6.80E-01  19
13        31.720,  1.966,  0.000        31.720, -1.966,  0.000 6.80E-01  19
14        35.556,  1.956,  0.000        35.556, -1.956,  0.000 6.80E-01  19
15        39.491,  1.947,  0.000        39.491, -1.947,  0.000 6.80E-01  19
16        43.425,  1.940,  0.000        43.425, -1.940,  0.000 6.80E-01  19

              -------------- SOURCES --------------

Source    Wire      Wire #/Pct From End 1    Ampl.(V, A)  Phase(Deg.)  Type
          Seg.     Actual      (Specified)

1          10     2 / 50.00   (  2 / 50.00)      1.000       0.000       V

Ground type is Free Space
This model happens to be symmetrical in the X axis. The longest element is under 5' and the element diameter for the model is a little larger than 5/8". Note that the boom length is only about 43.5' long or about half the length of a dual rhomboid.
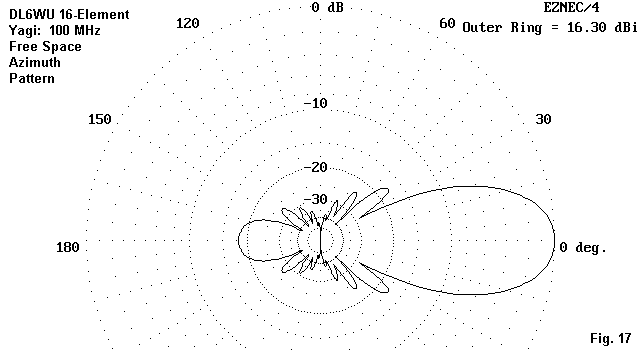
Fig. 17 presents the free space azimuth pattern for the 16-element Yagi. For comparative purposes, the modeled performance figures at 100 MHz are these.
Gain      F-B       B/W       F/S       Feed Z
dBi       dB        deg.      dB        R+/-jX
16.30     17.98     29        17.41     48 - j4
Although the front-to-back ratio of this particular model is under 20 dB, the overall power found in side lobes is much smaller than that in any of the rhomboid models. The front-to-side ratio is very good for rejection of QRM from those regions.
The beamwidth (29 degrees between -3 dB points) makes the antenna considerably easier to aim than any of the rhomboid models, whose beamwidths are only a third as wide. The Yagi's wider beamwidth can be either an advantage or a disadvantage, depending upon the operating requirements for the antenna.
The DL6WU antennas scale easily, so long as one remembers to scale the element diameter as well as the lengths and spacings. At 432 MHz, the element diameter for optimal performance is 4 mm.
The basic information is this:
L1 = 3.5 wl = 34.425' at 100 MHz
L2 = 6.0 wl = 59.014' at 100 MHz
Angle A (for L1) = 26.1 degrees
Angle B (for L2) = 18.85 degrees
Let us assume that Laport used true rhombi, with parallel sides. The result is a set of calculations, sketched in Fig. 18.
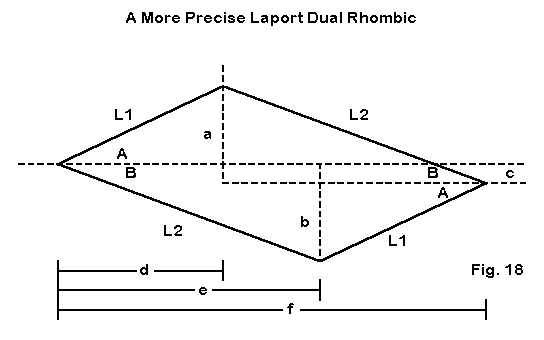
The figure shows only one of the two rhombi. The horizontal line will have coordinates 0,0 at the left.
Side a, from the through horizontal line upward to the end of L1 will equal sin A * L1 = 15.144'. Side b, from the through horizontal line downward to the end of L2 will equal sin B * L2 = 19.067'. If the sides are parallel, the distance c will equal side b - side a = 3.923'. Distance d from the origin to the end of L1 will equal cos A * L1 = 30.915'. Distance e from the origin to the end of L2 will equal cos B * L2 = 57.031'. Distance f from the origin to the far peak of the rhombus will equal d + e = 87.946'.
These numbers provide us with coordinates for both rhombi of the Laport antenna. They appear in the model description below.
Dual Rhomboid:  Laport-CATJ                 Frequency = 100  MHz.

Wire Loss: Copper -- Resistivity = 1.74E-08 ohm-m, Rel. Perm. = 1

              --------------- WIRES ---------------

Wire Conn.--- End 1 (x,y,z : ft)  Conn.--- End 2 (x,y,z : ft)  Dia(in) Segs

1   W4E2   0.000,  0.000,  0.100  W2E1 -15.144, 30.915,  0.100    # 12  150
2   W1E2 -15.144, 30.915,  0.100  W3E1   3.923, 87.946,  0.100    # 12  257
3   W2E2   3.923, 87.946,  0.100  W4E1  19.067, 57.031,  0.100    # 12  150
4   W3E2  19.067, 57.031,  0.100  W1E1   0.000,  0.000,  0.100    # 12  257
5   W8E2   0.000,  0.000, -0.100  W6E1 -19.067, 57.031, -0.100    # 12  257
6   W5E2 -19.067, 57.031, -0.100  W7E1  -3.923, 87.946, -0.100    # 12  150
7   W6E2  -3.923, 87.946, -0.100  W8E1  15.144, 30.915, -0.100    # 12  257
8   W7E2  15.144, 30.915, -0.100  W5E1   0.000,  0.000, -0.100    # 12  150

            -------------- SOURCES --------------

Source    Wire      Wire #/Pct From End 1    Ampl.(V, A)  Phase(Deg.)  Type
          Seg.     Actual      (Specified)

1           1     1 /  0.00   (  1 /  0.00)      1.000       0.000      SV
2           1     5 /  0.00   (  5 /  0.00)      1.000       0.000      SV

              --------------- LOADS ---------------

Load      Wire      Wire #/Pct From End 1      R (Ohms)       X(Ohms)
          Seg.     Actual      (Specified)

1         257     2 / 99.81   (  2 /100.00)     300.000         0.000
2           1     3 /  0.33   (  3 /  0.00)     300.000         0.000
3         150     6 / 99.67   (  6 /100.00)     300.000         0.000
4           1     7 /  0.19   (  7 /  0.00)     300.000         0.000

Ground type is Free Space
You may notice several alterations in this model relative to those used in preceding parts of these notes. First, two independent rhombi are used, each with its own feed and load. This move preserves the geometry of the rhombi. Second, to avoid flat wires at either end of the rhombi, split loads are used for the terminating resistors and split feed is used for each rhombus. This technique involves a compromise and a modeler's judgment of priorities. In this case, preservation of wire geometry was given priority over exact equalization of segment lengths for each fed and load segment. The model employs a high number of segments (1648), but may still not be perfectly converged. The segment lengths are equal to two decimal places, but very slight differences in segment length for split loads and feeds can prevent convergence until a very high number of segments is used in a model.
Despite these potential shortfalls of perfection, certain trends make the results close to precise. First, for all stages of convergence testing from about 800 segments upward, the same terminating resistor values produced maximum front-to-back ratio in each model tested with different wire sizes. Gain, beamwidth, and front-to-side lobe ratio remained very close during the tests, although the higher the number of segments, the better the reported front-to-back ratio. Only the feedpoint impedance remained somewhat variable.
The following results were obtained for #12 and #6 copper wire. In the table, the given value of terminating resistor--chosen for the best front- to-back ratio--represents a series combination of two load resistors in the model description. The feedpoint impedance given is the composite parallel impedance for the two sources connected in parallel. The rhombi are vertically separated 0.2' (2.4").
Wire  Dia.     Res.      Gain      F-B       B/W       F/S       Feed Z
Size  In.      Ohms      dBi       dB        deg       dB        R+/-jX
12   .0808     600       15.01     23.38     12.4      12.10     398 - 122
 6   .1620     550       15.08     23.48     12.4      11.94     348 - 130
The most interesting facet of the exercise in trying to make the Laport antenna model more precise does not appear in the tabulated numbers. Rather, it appear in the azimuth pattern of Fig. 19.

The Laport antenna does indeed have potential for controlling the side lobes of the rhombic configuration. Only 3 forward side lobes rise much above -20 dB relative to the main lobe, and they are down by more than 12 dB. The reduction in rearward lobes is significantly improved relative to any of the preceding models used in these notes. Whether or not this model has succeeded in capturing the Laport dual rhombic in exact precision, it is clear that Laport was on the right track in his efforts to reduce side lobes from rhombic antennas. Perhaps the only thing not yielded by the design is the absolute maximum in gain.
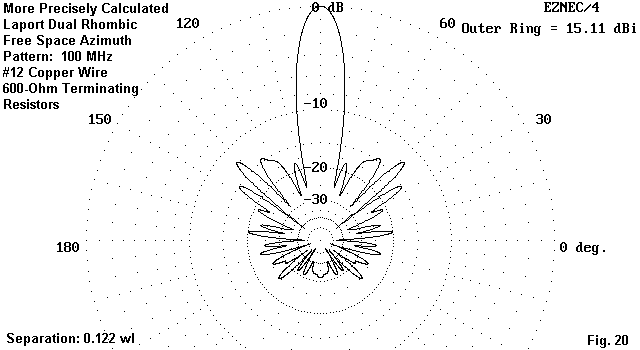
Spacing between the two rhombi does make a difference in performance characteristics, including the feedpoint impedance, which rises as the wires are brought closer together. If the spacing is increased, we obtain a lower source impedance, higher gain, high front-to-side lobe ratio, and--up to a peak value--higher front-to-back ratio. I ran a small table of ever-increasing spacing using the #12 wire, 600-Ohgm terminating resistor model, and I obtained the following results.
Space  Space     Gain      F-B       B/W       F/S       Feed Z
Feet   WL        dBi       dB        deg       dB        R+/-jX
0.2    0.020     15.01     23.38     12.4      12.10     398 - 122
0.4    0.041     15.05     29.04     12.4      12.18     342 - 105
0.6    0.061     15.07     34.27     12.4      12.23     316 -  88
0.8    0.081     15.08     35.21     12.4      12.26     303 -  77
1.0    0.102     15.10     33.13     12.4      12.30     295 -  68
1.2    0.122     15.11     31.45     12.4      12.32     290 -  62
The gain rises continuously with increasing space, although the peak cannot be far off the chart. The front-to-back ratio increases until the spacing reaches 0.8' (0.081 wl). There is no sign where the increase in front-to-side lobe ratio may peak. Given the reported impedance figures, a spacing in the region of 0.081 wl may be most optimal for a balance of operating characteristics. Why increased spacing tends to improve performance appears to be a function of the fact that the wires of the two rhombi cross at less than right angles. THus, there is significant coupling between them. For any given geometry for the individual rhombi, there is likely a spacing that optimizes the operating characteristics. Fig 20 provides an azimuth pattern of one of the most fully optimized Laport dual rhombic antennas obtained in this series of experiments. Even so, note the fact that, relative to the rear lobes in Fig. 19, some of the rear lobes in this pattern are beginning once more to grow.
The Laport design deserves further study, with special reference to the designer's original papers. These notes have gone only so far as the available information will permit. Hopefully, they have indicated some useful directions for additional effort.
Updated 8-17-99. © L. B. Cebik, W4RNL. Data may be used for personal purposes, but may not be reproduced for publication in print or any other medium without permission of the author.