MODELING AND UNDERSTANDING SMALL BEAMS
PART 7: SHRUNKEN QUADS
Quad beams remain one of the most controversial antennas around, simply because we inevitably want to compare them to linear Yagis of similar element numbers. Entire books have been written on the quad, the two most notable of which are the Orr and Cowan classic and the more recent detailed study by Haviland.1 The foundation of the quad is the full-wavelength loop, which builders have constructed in squares, rectangles, diamonds, and even circles.2 Whatever the shape of this structure, it is mechanically ungainly, requiring a nonconductive support structure (or at least one in which the conductive portions are broken into nonresonant or non-detuning lengths) for a wire loop. Putting two or more such elements together has been a challenge for both commercial and home builders. If high winds mangle Yagis and quads equally, ice has shown a distinct preference for the destruction of quads.
Reducing the dimensions of the quad loop has been an enterprise almost as old as the quad itself. If the quad loop can be shrunk considerably, then the mechanical problems diminish almost as the square of the percentage of shrinkage. The ingenuity of home builders in trying schemes for shortening the quad has produced diverse techniques. In his own "corner-inductor" version of the shortened quad, KA2OIG/TI2 noted that "in the literature on reduced quads there are examples of top-hat or capacitive loading, linear loading, stub loading, trap and coil loading, a folded-mini, and finally coil loading."3 Almost all of these systems add one or another physical complexity to quad construction as repayment for the reduction in overall antenna loop size.
More recently, N4PC has experimented with a diamond-shaped "squished quad" using linear loading at the voltage maxima, which are located half way up the vertical sides in a quare design and at the horizontal apexes of the diamond design. The object was to leave as much as possible of the high-current portion of the antenna unaffected by loading, thereby maximizing gain. The added wire at the voltage maxima could be a continuation of the overall wire loop, thereby simplifying mechanical construction.4 Except for the copper wire losses, the mid-side or voltage-maximum loading scheme avoids losses associated with the use of coils and capacitors as loading elements. In addition, voltage-maximum loading is usable with both diamond and square quad loops.
N4PC's success with the "Squad" left some question as to what sort of performance we might expect of such an antenna in advance of building one. If, as he noted, 85% of the antenna current occurs in the center-most 65% of the antenna wire, what would this mean for overall antenna performance? The availability of NEC-2, which can handle complex geometries with some ease (as long as the wire diameter does not change) suggested that modeling both the squad and the loops that compose its elements might be an instructive exercise. The result was my own version of a shrunken diamond-form 2-element quad for 10 meters with dimensions less than 7' per side.
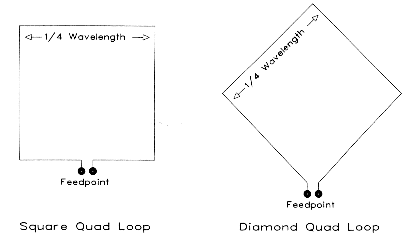
Despite the plethora of articles on quads, data on the proper dimensions for a simple quad loop are hard to come by. The traditional formula, L (in feet) = 1005/f (in MHz) is simply wrong for bare copper wire. Additionally, the diameter of the wire will have an influence on the total length of the quad loop. Thus, any formula given must be specified for the wire size as well. On 10 meters (28.5 MHz design center), the proper length (in feet) for a resonant quad loop of #14 bare copper wire is approximately 1045/f (in MHz). At 28.5 MHz, this yields a circumference of about 36.5' or about 9.13' per side. These dimensions apply to both the square and diamond configurations shown in Fig. 1.
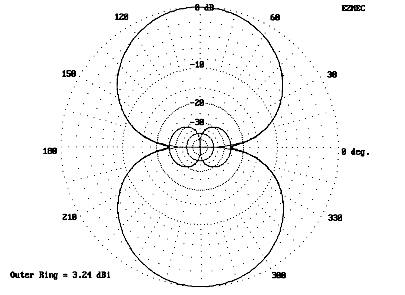
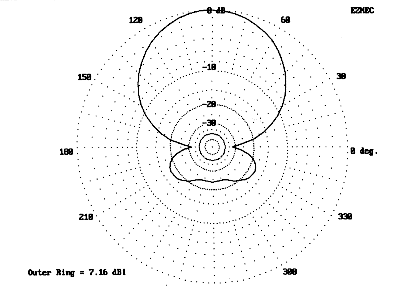
Whether square or diamond, the loop provides a free space gain of about 3.25 dBi (about 1.1 dB greater than a free space dipole of similar materials). The pattern shown in Fig. 2 displays both the horizontal and vertical components of the total far field pattern: the vertical component is insignificantly larger for the square loop. The feedpoint impedance is between 125 and 130 Ohms resistive for both configurations.5 Free space gain and feedpoint impedance figures can be used with confidence for the comparisons that follow, since none of the models exhibited any surprising changes in characteristics when modeled over real ground. If a shrunken model exhibits a reduced gain relative to a full size model of 1 dB in free space, an equivalent reduction will be found in models over real ground.
Three types of shrunken quad loops, shown in Fig. 3, were modeled for performance comparisons. All use #14 copper wire. The diamond loop (referred to as "Diamond loop: 1LL" on graphs) has a circumference (in feet) of 725/f (in MHz), about 25.5' or about 6.36' per side. The diamond is thus about 70% full size. One advantage of the diamond is that it allows the most room for the voltage-maximum linear load, shown as the side insets on the diagram. The model uses a short horizontal feed wire to reflect usual diamond quad loop construction. Using a perfect diamond with a split feed yielded linear load lengths only 3/4" longer than those indicated by the single feed model at 28.5 MHz, with no change in feedpoint impedance.

A comparable square requires a larger circumference to permit resonance at the design center frequency of 28.5 MHz, since the maximum inset linear load is shorter. The model used here (designated "Square Loop: 1LL" on graphs) answers to the formula 789/f (in MHz), which is about 27.7' overall and 6.92' per side. The resulting quad loop is about 76% full size. Its advantage mechanically is that the X-members or spreaders supporting the wire can be 10' long, a convenient hardware store supply dimension.
N4PC used a double inset linear load on his Squad. Therefore, a third version seemed appropriate for modeling, a square with a double inset (designated "Square Loop: 2LL" on graphs). The double inset permits a reduction of the circumference to about 689/f (in MHz) or 66% of full size. The 24' circumferences is distributed at 6' per side.
Initially, all voltage-maximum loads were identically constructed (except for length). Composed of #14 copper wire, they are 3" (0.25') wide and extend inward from the side wires horizontally toward the center of the element assembly, as shown in Fig. 3.
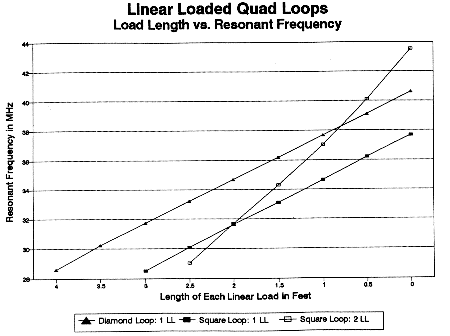
For each type of loop, the resonant frequency is close to a linear function of the load length, as Fig. 4 demonstrates. Each loop size was chosen to resonate at 28.5 MHz with the load length at or near its practical maximum length to achieve the smallest loop size possible. The diamond loop allowed 4' load-lines on each side of center, while the single-load square allows 3' load lines. The double-load square is 3' on a side by fiat, which yielded a load-length on each side of 2.595' for resonance at 28.5 MHz. With an even 2.5' of load length per side, the resonant frequency rises to 29.05 MHz as the starting point of the graph.
The single-load diamond and square loops show nearly parallel linear rises in frequency as the load length on each side is reduced toward zero. In contrast, the double-load square loop increases in frequency at almost twice the rate of either single-load loop. Thus, the double-load line is much more frequency-sensitive to adjustments.
As one might expect, the longer the load-line at resonance of the loop, the lower the gain of the loop. Because the load lines are of the same material as the element, the only losses are those of the copper wire in the line, which are too small to account for the reduction of gain in all loaded quad loops. The gain of a quad loop is in part dependent upon its physical size. Hence, any shrinkage of the loop relative to a full-size loop at resonance will reduce its gain. In turn, reduction of loop gain will limit the gain obtainable from a multielement quad beam using these shrunken loops.

Fig. 5 displays the gain of loops using voltage-maximum loading, with each length of linear load corresponding to a resonant frequency for the assembly (see Fig. 4). Comparisons are possible only where corresponding loops have the same length of load line. For all practical purposes, the gains of the single-load elements, diamond and square, are the same (under 0.05 dB difference). However, the gain of the double-load-line square is significantly less than that of either single-load configuration, reaching more than 0.25 dB difference at a 2.5' load length. At that load length, the single-load elements have lost about half the advantage of a full size quad over a dipole; the double-load element is only slightly better than a dipole.
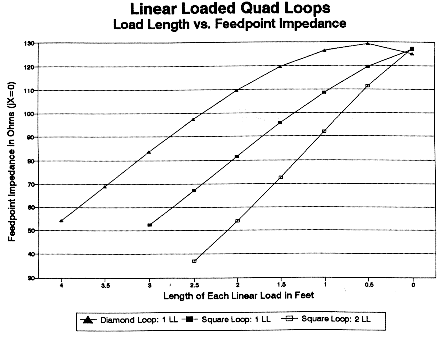
Both of the single-load loops show a resonant feedpoint impedance just above 50 Ohms, as shown in Fig. 6. The square element progresses in near linear fashion toward the impedance value of an unloaded resonant quad as the load line is shortened. However, the diamond loop reaches a peak value with load lines of 0.5' each. Like the single-load square, the double-load line square displays a near-linear rise in impedance value. Near the design center frequency, its feedpoint impedance is in the 35-Ohm region.
Of the three configurations, the double-load-line element shows the least promise, despite its great compactness. Its low feedpoint impedance and noticeably reduced gain relative to the other shrunken loops suggest inferior beam performance. Add to these factors the frequency-sensitivity of the assembly to adjustments, and the configuration loses more appeal. A 6' wide and high 10 meter quad would not likely be worth the effort to build; however, a 7' wide and high quad beam may be well worth the effort, especially at about 58% of the volume required by a full size beam.6
Before attempting a 2-element antenna, we should note that changing the spacing of the wires in the linear loads also changes the characteristics of a single element quad loop slightly. Although gain and feedpoint impedance do not change enough to alter design considerations, the resonant frequency for a given length of load on each side of the loop will create design concerns. Fig. 7 shows part of the curve of load length and resonant frequency for three different load widths. Narrowing the spacing between load lines for a given load length raises the resonant frequency of the loop. The amount of resonant frequency increase is proportional to the percentage of decrease. The decrease from 2" to 1" yields a larger increase in resonant frequency than the decrease from 3" to 2" of load width.
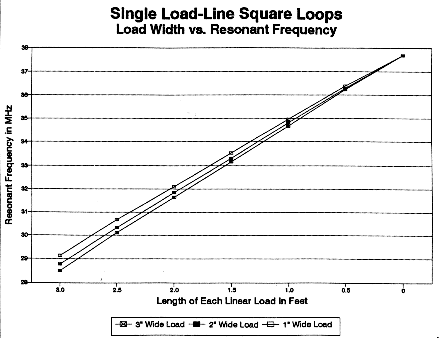
Looking at the assembly from a different perspective, the narrower the line width, the longer the load line needs to be for a desired resonant frequency. Resonating a 1" wide load line at 28.5 MHz would have required a line longer than the 3.46' from the side wire to the center of the quad element. At the far right end of the scale, of course, all three curves on the graph converge as the load line reach zero length.
Wider spacing between the load lines reduces the necessary line length for a given resonant frequency. However, increasing the spacing beyond 3" (say, to 6, 9 or 12") produces only marginal shortening. Lines spaced 1' apart are only half a foot shorter for the single-line square and the diamond than lines spaced 3" apart for resonance at 28.5 MHz. Since maintaining the larger spacing would add weight to the small 10-meter structure, the 3" line spacing represents a good compromise between mechanical and electrical efficiency. wider spacing might be used in a pinch if a given load-line length does not quite reach down to the desired resonant frequency: increasing the spacing by an inch or two is equal to adding a few inches to the line length at its narrower spacing.
Because a quad loop, loaded or unloaded, has gain over a dipole, it qualifies as an array of sorts. However, it is barely an array (two bent dipoles touching ends). If one goes to the trouble to construct a full wavelength loop, one might as well construct two and have a classic 2-element quad beam.
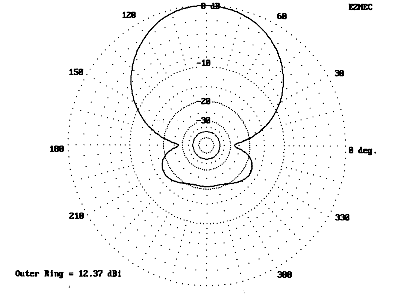
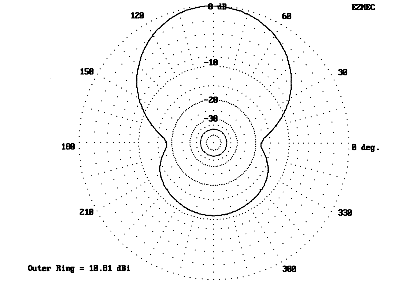
A full-size 2-element quad beam consists of two quad loops cut to optimal dimensions and spaced for the closest conjunction of gain and front-to-back ratio. Many formula sets are available, for example in Orr and Cowan, the ARRL Antenna Book, and Haviland. Fig. 8 outlines the parasitic quad beam and provides formulas for a close-spaced version (1/8th wl). Using #14 wire at a design center frequency of 28.5 MHz, the beam shows a free space gain of over 7 dBi with a front-to-back ratio over 23 dB. With a feedpoint impedance of about 100 , the antenna falls in the middle of the 75 to 125 feedpoint impedance range common with quad designs.

The sample quad beam is neither the best performer nor the broadest-banded of possible quads, since its spacing is somewhat close by quad standards. However, it demonstrates the performance characteristics that lead many to choose quads over 2-element Yagis or 3-element trap-Yagis: it has higher gain and a very respectable front-to-back ratio (in fact, a good front-to-rear ratio, if we look at everything to the rear of the main lobe). Fig. 9 shows the free space azimuth pattern of the antenna.
Full-size quads tend to perform well at modest heights. Fig. 10 and Fig. 11 show the beam azimuth pattern at the angle of maximum radiation for the antenna at heights of about 5/8 wavelength and about a full wavelength above medium ground. Although the pattern of ground reflections tends to degrade the rearward performance at the lower height, at a wavelength, the antenna recovers close to full free-space front-to-back ratio. The broad beamwidth provides good forward coverage for general operation.

These notes on full-size quads are not a recommendation of the antenna. For further data on modeled quads of all sizes, see Some Model Quads Parts 1-7, at this site, as well as standard quad references. Instead, the notes here provide a set of standards against which to compare shrunken quads with side (voltage-maximum) loading. Whereas the full-size quad requires either that the reflector be physically larger than the driven element or that an inductive stub be added to electrically lengthen the reflector, any model of a side-loaded shrunken quad can be adjusted solely by lengthening or shortening the linear load elements. In fact, for most models, the driven element will require a shorter load and the reflector a longer one than a resonant single quad element.
         Table 1.  Construction Values for Three Models of Side-Loaded Shrunken Quads

Type               Formula           Total L      L / side    DE load L    RE load L   L-Support

Diamond            725/f (MHz)       25.44'       6.36'       3.64'        4.07'       9.0'

Square: 1LL        789/f (MHz)       27.68'       6.92'       2.62'        2.98'       9.8'

Square: 2LL        684/f (MHz)       24.00'       6.00'       2.42'        2.58'       8.5'

Notes:

1.  DE and RE load lengths refer to the length of each of two identical load lines at the center of each vertical
wire on the square models and at the horizontal apexes of the diamond model.  See Fig. 3 for reference.

2.  L = length of wire or wire assembly, including the total circumference of each loop, the length per side, the
length of each load assembly consisting of two wires and a junction, and the length of the support element
reaching across the antenna from apex to apex.

3.  All three models use #14 copper wire.

Table 1.  Construction values for three 1/8 wl spaced shrunken quad beams, using side-loading for both the
driven element and the reflector.
Table 1 provides initial dimensions for test model shrunken quads for each of the three types of loops investigated. Spacing is a constant 4.31' (1/8 at 28.5 MHz). Each driven element was resonated and each reflector adjusted for maximum front-to-back ratio at approximately 28.5 MHz. Although reflector adjustment affects primarily the antenna feedpoint resistance and driven element adjustment affects primarily the feedpoint reactance, the two adjustments are sufficiently interactive to require a few iterations before optimal values appear.
All three types of loaded quad loops can be molded into a reasonable parasitic beam. To assess how well we might expect them to perform requires that we look at some of the parameters that can be modeled and compare those values with numbers for a full size quad. Using the entire 10-meter band as a baseline, we can better appreciate what some of those numbers may mean.
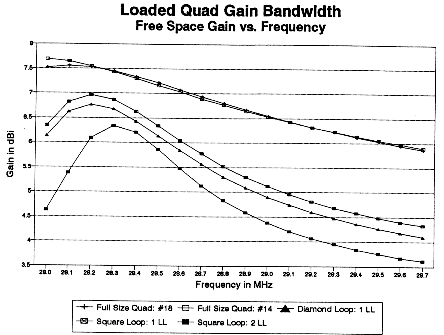
Fig. 12 provides a snapshot of the gain performance of the three shrunken beams in comparison with two full size quads, one using #18 wire, the other using #14 wire. Because quad gain does not peak at the same point as the front-to-back ratio, the two full size quads show a decreasing gain across the band. The #14 full-size quad peaks outside the lower end of the band. However, both beams maintain above 6.5 dBi gain for the first MHz of the band, peaking above 7.15 dBi. For comparison, the broadband 2-element Yagi used as a standard in other parts of this series has a maximum gain of about 6.1 dBi.
The two single-load-per-element quads show a considerable peak in gain--above 6.7 dBi--but only over a smaller segment of the band. Like any shortened antenna, the gain cannot approach that of a full size model. Like any loaded antenna, the bandwidth for most characteristics will be smaller than that of a full size model. The square double-load-line model provides the lowest gain and the narrowest gain bandwidth of all three. At the upper end of the band, its gain drops to that of a full-size single quad loop.
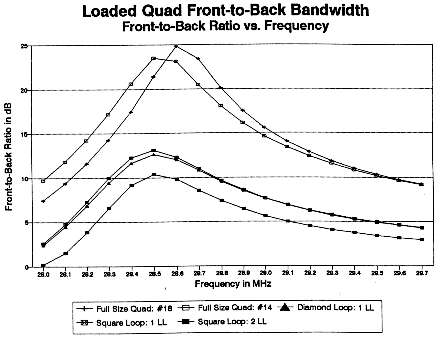
Similar comments apply to the front-to-back ratios of the quad beams, as displayed in Fig. 13. The two full size beams have front-to-back ratios that peak above 25 dB (but at frequencies between the check points that form the graph). The ratio falls off fairly rapidly below design center frequency and more slowly above that frequency.
There is little to distinguish the front-to-back performance of the single-load-line shrunken quads. The front-to-back ratio peaks at about 13 dB, falling off rapidly at the low end of the band and more slowly at the higher end. The standard broadband Yagi, by contrast, holds its front-to-back ratio at about 10 dB or better across the first MHz of 10 meters. The double-load-line model not only has a lower peak front-to-back ratio (less than 10.5 dB), but as well its band-edge values fall well below 5 dB. Except for a 200 kHz window, its ability to reject QRM is marginal or worse.

The SWR curves relative to 50 Ohms and to 75 Ohms, respectively, shown in Fig. 14 and Fig. 15, provide a lesson in some of the illusions of a low SWR. For the full-size quads, a quarter-wave 75-Ohm matching section or a 2:1 transformer would provide a good match between the antenna and a 50-Ohm coaxial cable. At the high end of the band, the SWR performance appears worse than that of the shrunken quads, which exhibit a good match to 75-Ohm cable from the design center frequency to the upper edge of the band.

However, one cannot take these numbers in isolation. The steep portion of the shrunken quad SWR curves at the lower end of the band overlaps the antenna's gain peak: the input impedance is most variable where the antenna performs best. In contrast, the curve is flattest in the region where the antenna barely shows beam characteristics. The SWR bandwidth curves of the shrunken quads are essentially more exaggerated versions of the curves for full-size quads, but those exaggerations have more pronounced negative affects upon antenna performance across 10 meters.
In essence, all three shrunken quads are narrow-band performers when gain, front-to-back ratio, and SWR (or feedpoint impedance) are taken together. Optimal performance covers about 200 kHz of 10 meters, with reasonable performance for about another 100 kHz each way.
The single load-line models, whether diamond or square, clearly outperform the double-line model. Moreover, in optimizing models of the double load-line model for maximum performance, adjustments as small as 0.001' made a somewhat significant difference. In adjusting the single-line models, change minimums of 0.01' sufficed to optimize the model. (An inch is 0.0833.')

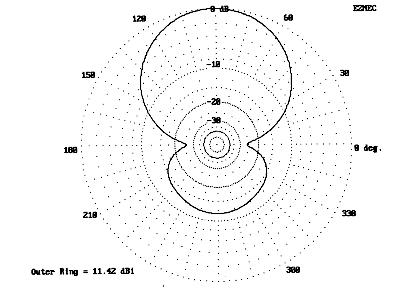
Between the diamond and the square there is little to choose in performance. Fig. 16 shows the azimuth pattern of the diamond in free space; the pattern of the square is too similar to need reproduction. In evaluating either or both these small beams, investigate the patterns over real ground at the planned height. The azimuth pattern of the diamond (taken at the angle of maximum radiation in Fig. 17) at 5/8 wl height shows a considerable rear lobe that is unlikely to provide much rejection. (The equivalent rear pattern of the standard broadband Yagi is smaller.) At a full wavelength up (Fig. 18), matters improve, especially with respect to side-rejection, but not to the level of a full size quad.
Because these initials models used close spacing and identical loops, with their electrical sizes adjusted by changing the length of the loading lines, they do not achieve all of the gain and front-to-back ratio possible from a shrunken quad beam. Just how much more you can obtain from side-loaded elements depends to a great extent on how much you are willing to unshrink the loops and spread them apart.
In an attempt to improve the anticipated performance of a shrunken quad, I explored several models that alternately increased the spacing between elements and gradually enlarged the physical size of the reflector. The basic dimensional properties of these models are listed in Table 2. Model 1 is the same square quad with a single load line per element used above. Model 2 increases the spacing to 5' (about .14 ), close to the optimum value recommended by Orr and Cowan for a full size 2-element quad. Model 3 returns to the 1/8-wavelength spacing, but enlarges the reflector about 4.5%. Using the new reflector size, Model 4 increase spacing to 4.65' and model 5 further increases spacing to the 5' mark. With this new spacing, model 6 further increases the reflector size to 7% over the original. All models were optimized for maximum front-to-back ratio at a design center frequency of 28.5 MHz.
           Table 2.  Some Variations on the Single Load-Line Square Quad

Model        Length of Driven Element       Length of Reflector      Spacing
             per side in feet               per side in feet         in feet

 11                6.92'                          6.92'                4.31'
      LL                 2.62'                          2.98'2

 2                 6.92'                          6.92'                5.00'
      LL                 2.72                           3.01

 3                 6.92'                          7.24'                4.31'
      LL                 2.64'                          2.69'

 4                 6.92'                          7.24'                4.65'
      LL                 2.68'                          2.71'

 5                 6.92'                          7.24'                5.00'
      LL                 2.72'                          2.73'

 6                 6.92'                          7.40'                5.00'
      LL                 2.72'                          2.56'


Notes:

1.  Model 1 is the same as the single-load line model used in the comparison with other loaded
configurations above.  Models 2 through 6 vary the size of the reflector or the spacing or both.

2.  LL=length of load-line assembly on each side of the element.  All load lines are #14 copper
wire (same as the antenna element) with a spacing of 3" between lines.

Table 2.  Some variations on the single load-line square quad to improve performance.
Fig. 19, 20, and 21 graph the results of these modeling experiments. Because performance falls below usable values above 29 MHz, the graphs are limited to data for the first MHz of 10 meters.
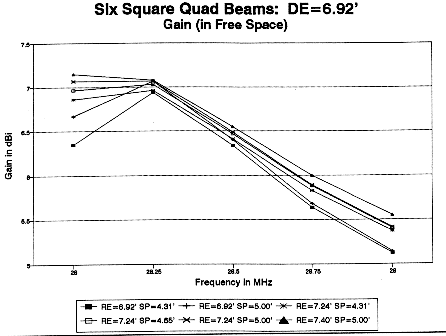
In general, gain increases with spacing, as Fig. 19 demonstrates. All three models with 5' spacing show the highest gain peak (at 28.25 MHz). However, the smaller the reflector, the more quickly the gain decreases as the frequency departs from the gain center. In fact, model 6, with the largest reflector in the sequence, actually shows a slight increase in gain toward 28 MHz. Merely enlarging the reflector will not increase peak gain, as a comparison of model 3 and 1 at 28.25 MHz will establish. However, enlarging the reflector will increase the gain-bandwidth. Model 3's gain falls off more slowly than that of model 1.
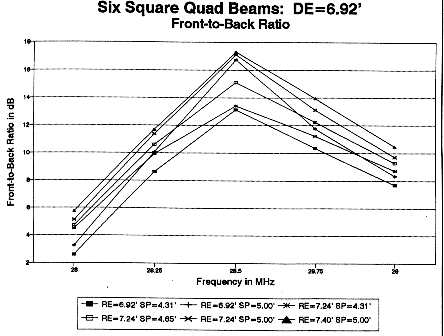
The front-to-back ratio of the antenna, shown in Fig. 20, also increases most dramatically with increased spacing between the two loaded elements. Model 2, with equal size elements but 5' spacing, rivals the largest reflector for peak front-to-back ratio. The models with the largest reflector dimensions show the slowest decrease in front-to-back ratio as the frequency departs from the design center. However, none of the models is a stellar performer at the low end of 10 meters.

The SWR bandwidth relative to 75 is shown in Fig. 21. All of the models show a fairly flat line and a good 75-Ohm match above the design center frequency. Below design center, greater spacing more dramatically flattens the SWR curve than does a larger reflector. Notice model 2 (equal size squares at 5'), whose SWR curve largely overlaps the curve of model 4 (an intermediate size reflector at an intermediate spacing). However, the combination of the two factors, as in models 5 and 6, produces an antenna that is a direct match for 75-Ohm coax from 28.25 MHz to 29 MHz.
Summing up the three sets of characteristics, wide spacing and a physically larger reflector produce the maximum gain, highest front-to-back ratio, and the flattest SWR curve. However, the antenna remains superior to a standard 2-element Yagi only over about 500 kHz, with usable directional characteristics for about another 250 kHz. For effective use at the low end of 10 meters, the design center should be set another 250 kHz lower to bring the front-to-back ratio up to productive levels and to bring the feedpoint impedance to levels easily matched in a 75- system. However, the practical upper limit of the antenna as something better than a single full-size quad loop would then be about 28.75 MHz.
If the narrower bandwidth for full performance is acceptable and there is a need for compactness, then a shrunken quad can be a good choice. If hardware store supplies are the source of the antenna parts (except for the #14 wire, a Radio Shack staple), then perhaps the model having equal-size loops and 5' spacing may be the best choice. Larger reflectors would require supports longer than standard 10' lengths of thin-wall PVC. The diamond tends to shed ice and water better than the square. However, the square requires less horizontal space.
The test antenna was a diamond single-load-line quad with equal size loops spaced 5' apart. This configuration permitted an all-PVC support system on a 5' boom of 1.25" nominal Schedule 40 PVC. The spreaders are 9.1' lengths of PR 315 0.5" nominal PVC. Each piece fits through a 0.875" hole through the boom, adjacent holes for spreaders at each end. #10 stainless steel (SS) hardware fixes each spreader in place. As shown in Fig. 22, spreaders are mounted about 9" to 10" from the ends of the boom. To the end of each spreader, I glued a half-inch Tee to carry the wire. At the sides, I glued extra 2" lengths of half-inch PVC, drilled at 3" spacing, to establish the load-line separation. (Of course, at the center of the boom is the plate and U-bolts for the boom-to-mast mounting.)
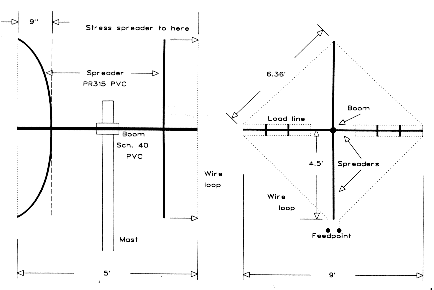
The total circumference of the diamond loop is about 25.4' long. With expendable twine, create a loop through the tees, stressing the spreaders outward towards the end of the boom. The twine loop should be just about the right circumference as the spreaders bend in a plane with the end of the boom. Stressing the spreaders prevents them from waving front-to-back in the wind and strengthens the overall structure.
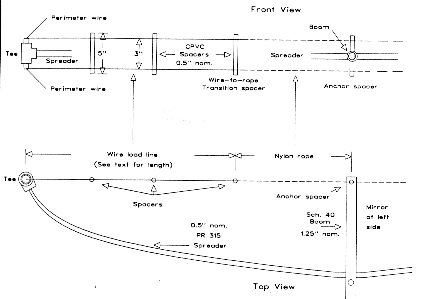
I drilled the end of the boom for an additional short piece of half-inch diameters CPVC about 5" long. (Tan CPVC is closer than white PVC to its listed diameter: 0.5" nominal diameter CPVC has an outside diameter just enough larger than a 5/8" hole-cutter to require a small amount of filing for a fit.) Drilled at a 3" spacing, this piece acts as the anchor for the load lines. A pair of short sections of 1/8" nylon rope will attach to the final spacer of the lines each side of center.
Models of the test antenna in free space, as well as at 20' and at 35' over real medium ground suggest driven element load line lengths of 3.6' to 3.8' each for the driven element and 4.0' to 4.1' for the reflector. I chose to install driven element lines (without a shorted end) of 4' and reflector lines of 4.25' to allow for variables of building. Although there is a slight mismatch with the model, since the Tees round the quad corners, the most significant variable concerns the stressing of the spreaders. I found that I tended to overstress the assembly, loosing a half inch or so of wire length per side. The longer load lines permit on-site adjustments before final soldering.
I used a single piece of wire for the top two sides and the top wire of each load line. Install at least 2 spacers (4" pieces of half-inch CPVC, drilled at a 3" spacing) on each load wire and tie off the load wire to a third spacer. Tie this last spacer to the one on the boom with the end of the nylon rope. Fig. 23 shows some of the details of the load-line arrangement. A single wire for the reflector lower half and load-line bottom wire replicated the top half, including load-line spacing and termination. Separate wires for the remaining sides and their associated bottom wire for the loads of the driven element completed basic assembly. Add thin position-locking wires, soldered to the main wire at each major corner, including the top spreader. A coax connector on an L-shaped piece of plastic completes assembly.
The resulting structure, with outward-curved spreaders at each end of the boom has its own aesthetic appeal. More significantly, it is sufficiently rigid to hold its shape in a gale, but flexible enough to wiggle through the breezes, transferring spot stress throughout the structure.
Initial testing can be done with the beam pointed skyward. Temporary shorting bars permit easy adjustment. I used short lengths of #12 copper wire terminated with ring connectors. Around the load-line wires I crimped half-inch L-brackets, passing a #6 bolt through the two holes and the ring connector on one end of the #12 wire.
If not off the mark by more than a half MHz, you can initially adjust the driven element for lowest SWR as a marker of resonance. Adjusting the reflector will either be a matter of guess work or of in-place adjustment. A low-level signal source at a distance of at least 10 wavelengths (about 350' on 10 meters) will help you find and adjust the minimum signal off the rear of the beam. On my test model, my initial guess-work settings, based on the computer models and upon my estimates of how much I shortened the beam during construction, allowed the reflector adjustment to be made in one trial, with no further work needed on the driven element. (I am not always--or even usually--this lucky, even with computer guidance.)
I added about 2.5" of length to each load line initially to compensate for loop compression during building (about half an inch short on each of the diamond's four sides). With a 50-Ohm coax line connected directly to the feedpoint, the final settings placed a minimum SWR window of 1.6:1 from about 28.3 to 28.7 MHz, with under 2:1 SWR from 28.1 to over 29 MHz. At a 25' height, these frequencies climbed about 0.2 MHz.
Reflector adjustment was also close to the compensated mark, requiring about a half-inch of load-line lengthening to place the maximum null at 28.5 MHz. Rechecks of the driven-element SWR proved unworthy of further adjustment. The reflector null was fairly sharp, with noticeable drops as little as 50 kHz off maximum. However, within the limits of simple S-meter readings of uncalibrated test signals, the curve tracked the model's predictions quite well. Once set, the difference between maximum null and the rearward signal at the band edges of 10 meters was about 2 S-units.
Although the shrunken quad can be operated as-is over a fair portion of 10 meters, its impedance is a better match for 75-Ohm cable than for the 50-Ohm test cable. A quarter-wave section of 75-Ohm cable might well improve the SWR bandwidth, although a 1.5:1 broadband transformer or transmission-line transformer might produce a more accurate match. The basic narrow bandwidth of the antenna's gain and front-to-back ratio will not be affected by these measures.
Because the shrunken quad can be built from wire and PVC, it is among the cheapest of the beams so far tested, even requiring the least hardware. N4PC's sturdier all-Schedule 40 construction for 17 meters is a model for lower band use.7 In fact, on the WARC bands, the narrow bandwidth of the shrunken quad's peak performance figures is no hindrance. Indeed, the antenna may have its best home on those bands. It is also at home wherever one requires a small footprint but can tolerate some offsetting vertical dimensions.
Alternatives to the use of linear load lines are unlikely to improve performance in any especially noticeable way. R. G. D. Stone, G3YDW, reported the same narrowness of performance and SWR bandwidth on his capacitively loaded miniquad for 20 meters.8 Indeed, voltage-maximum loading, whether by load-lines or linear capacitive "hats," is likely to yield the fewest loss sources of the many schemes used to shrink quads.
Capacitive hats, of course, are not limited to quads, nor to verticals. I wonder what they might do for a shortened Yagi.
1. See William Orr, W6SAI, and Stuart Cowan, W2LX, Cubical Quad Antennas, 3rd Ed. (Lakewood, NJ: Radio Amateur Callbook, 1993); and Bob Haviland, W4MB, The Quad Antenna (Hicksville, NY: CQ Communications, 1993). The number of articles on quads is legion--and this piece makes legion + 1.
2. For a circular quad, see Howard Hawkins, WB8IGU, "12-Meter Quad" in The ARRL Antenna Compendium, Vol. 3 (Newington, ARRL, 1992), p. 114.
3. Kris Merschrod, KA2OIG/TI2, "Coil Shortened Quads - A Half-Size Example on 40 Meters" in The ARRL Antenna Compendium, Vol. 2 (Newington, ARRL, 1989), p. 90. See this article for references in the literature to each of these loading schemes.
4. Paul Carr, N4PC, "The N4PC SQUAD (Squished Quad)" in Lew McCoy, W1ICP, Lew McCoy on Antennas (Hicksville, NY: CQ Communications, 1994), pp. 83-85. See this article for references to earlier work on the mid-side loaded quad.
5. All patterns and figures in this study are derived from NEC-2 in the EZNEC 1.0 package available from W7EL. It should be noted that tapered models in MININEC tend to show resonance with a length formula between 1044 and 1045 divided by the frequency in MHz, all other factors held constant. Since NEC-2 does not "cut" corners, it is used as a basis for discussion here. This preference applies only where the wire diameter is constant throughout the model. NEC-2 has difficulty with changes in wire diameter, especially in models with some degree of geometric complexity. The diameter change difficulty can be minimized by adding separate wires for the last portion of each corner. Using this technique for quads with tubing for the horizontal members and wire for the sides brings the gain figures into close coincidence with MININEC models, although the feedpoint impedance in the two modeling systems continues to diverge significantly.
The diamond models used here generally have a short horizontal 3-segment wire at the lower apex as the feedpoint. Compared to a pure diamond, fed at the apex under a combined split feed modeling system, the diamond models with the flattened bottoms tend to require a slightly smaller circumference (about 0.5%), which would make no significant difference in actual construction.
6. With each dimension about 75% of full size, the area is less than 58% of that of a full size quad loop. However, element spacing would remain unchanged from a full size model, yielding 58% as the volume gain as well.
7. See Carr, N4PC, "The N4PC SQUAD (Squished Quad)" in Lew McCoy, W1ICP, Lew McCoy on Antennas, pp. 83-85.
8. R. G. D. Stone, "Practical Design for a Top-hat Loaded 14 MHz Miniquad," Radio Communications, October, 1976, as quoted in Moxon, HF Antennas for All Locations, 2nd Ed. (RSGB, 1993), pp. 207-208.
Long after I completed my foray into shrunken quads, my perceptive YL, N4TZP, noticed my brief remarks on capacity-loaded quads. These versions of shortened quads use a single wire from the side points instead of the parallel lines that I used, following Paul Carr's lead. She asked a simple question: is there any advantage to one system of loading over the other?
The answer comes in two parts: 1. There is no electrical advantage to one system over the other. 2. There may be a mechanical advantage to one over the other, depending upon your quad construction technique.

Fig. 24 shows the physical layout of a 2-element diamond quad beam using a capacity "side" hat (the electrical equivalent of a vertical's top hat) to permit tuning the elements to resonance or other points. The diamond's dimensions are the same as the model built and tested from Fig. 22 and Fig. 23. Capacity hat dimensions are shown on one side for the driven element and on the other for the reflector. Element spacing remains the same at 5 feet.
I derived the dimensions by a simple modeling technique. From the final model of the quad I built, I erased one of the elements in each of two separate models and determined the resonant frequency of each element. Then I eliminated the parallel stubs and joined the side peaks. Finally, I created a capacity hat with a wire inset plus two wires parallelling the main element, adjusting their lengths until the loop was resonant on the same frequency as its stub-predecessor. I then rejoined the two separate elements in one model.
You can adapt this technique to the actual construction of antennas. Construct one element at a time and tune it to the resonant frequency given by a model that you have previously broken down into separate elements. Combining the elements should assure that you are close to optimal performance without concern for interpreting element interactions during tune-up.
The technique of replacing the stub by a capacity hat is justified on the basis of the fact that the two point originally separated by the parallel stub have the same current and can therefore be connected together. However, a capacity hat in one dimension (ignoring wire thickness) requires a greater length than a two-dimensional flat disk-type hat. The dimensions shown are applicable to #14 copper wire and to the separation wire length (0.5' in this model). As with the parallel wire stub, careful pruning is necessary.

Fig. 25 shows the free space pattern that resulted from the exercise. Forward gain (nearly 6.2 dBi) and front-to-back ratio (about 18 dB) are too close to the corresponding numbers for the stub-quad to make any difference in performance. SWR, gain, and front-to-back figures over 10 meters correlate well with those for the stub-quad.
Which shortening technique you use likely will depend upon your construction method. The stubs in the shrunken quad I built are preferable with the stressed support arms, since each stub rides free, with no nearby metallic masses to detune it. Scaling up the antenna for lower bands, however, may call for the capacity hat technique. If you use flat-face Xs to support the quad wires and if there is any metal in them, then the capacity hat technique may be better suited to your needs. It would reduce coupling to the support framework.
End loading antenna elements is a technique that deserves some further study. Although capacity hats are somewhat out of vogue in amateur antenna-making, except for vertical mobile antennas, they do offer somewhat higher efficiencies than other forms of loading. They load where the current is least, rather than adding coil losses at high current points or otherwise distorting the radiation pattern near the feedpoint. Although near-circular hats are considered somewhat ungainly, they may still have a place in at least monoband horizontal antennas.