In a past issue of AntenneX, I described the properties of a 2-meter Moxon rectangle and surveyed some potential uses for the antenna. There are almost innumerable ways to build the antenna--that is, ways to support the elements. However, it may be useful to go through the process of building a Moxon rectangle at least once as an exercise that may trigger further creative construction thoughts of your own.
What the Moxon Can Do
The basic azimuth pattern of a Moxon shows, at its design frequency, a deep null, with some forward gain. For most VHF uses, it is the pattern shape, with its very high front-to-rear ratio, that holds more interest than the antenna's gain.
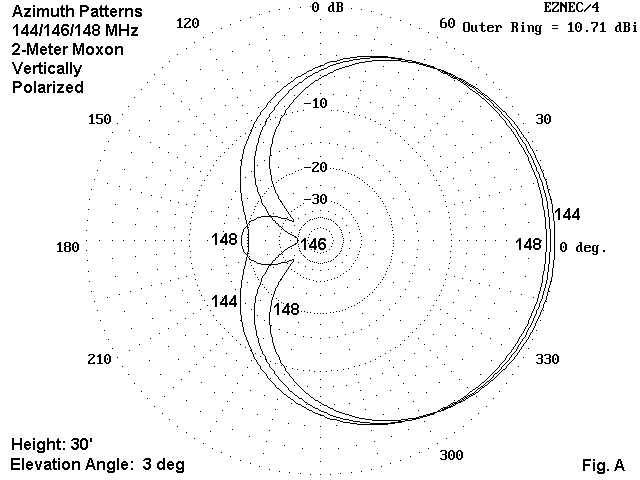
Fig. A shows the azimuth pattern of a 2-meter Moxon when the antenna is vertically oriented and, hence, vertically polarized. Patterns are shown across the 2-meter band for a model designed for 146 MHz. Even though the deepest null occurs only in the vicinity of the design frequency, the front-to-rear ratio--accounting for the full rear quadrant--is very good anywhere in the band.

Moreover, as Fig. B shows, the antenna has a very broad operating bandwidth. The SWR curve never reaches 1.4:1 anywhere in the band. For reference, here are band edge and center numbers for a modeled 3/16" element diameter Moxon placed at a height of 30', with readings taken at an elevation angle of 3 degrees:
Freq.     Gain      F-B       Feed Z
 MHz       dBi       dB       R +/- jX
144       10.7      18.6      40 - j 10
146       10.4      40.0      52 + j  1
148       10.1      19.7      63 + j 10
A 3-element Yagi might exceed the gain by about 2.5 dB, but would not equal the Moxon's front-to-rear pattern.
Vertically polarized, the Moxon can be useful in preventing interference when two repeaters use the same channel and can be accessed from some particular location. The fact that access is already possible suggests that gain is not an important consideration. However, reducing one's signal to the repeater not desired is a very significant goal. Likewise, at a repeater site itself, being able to direct one's signal away from a co-channel repeater may also be necessary on occasion.
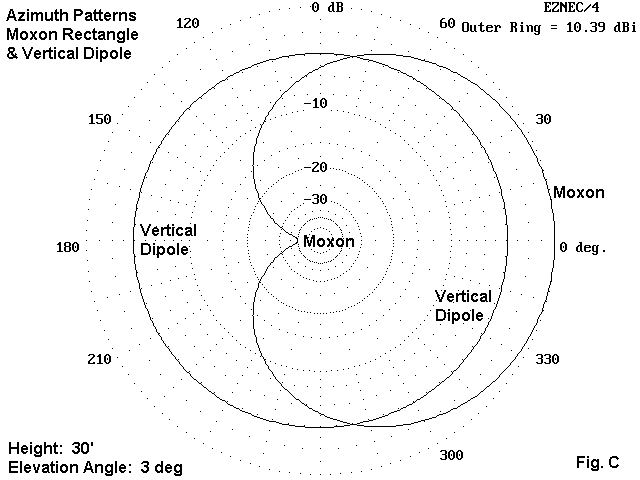
The advantage of the Moxon over the standard vertical antenna shows clearly in Fig. C. The model uses a vertical dipole, but patterns for a monopole with ground-plane radials or a J-pole would be very similar to those for the dipole. The most important portion of the graphic to examine is where the Moxon pattern does not go. Since my area has a number of very strong repeaters in many directions, I decided to test the Moxon by building one.
The Basic Antenna Configuration
Fig. 1 shows the basic outline of a Moxon rectangle for 146 MHz using 3/16" aluminum rod elements.

Essentially, I settled in on the Moxon dimensions from 2 directions. I scaled a 1/8" element diameter model upward, and I scaled a 1/4" element diameter model downward. In this way, I arrived at 2 sets of dimensions, both of which promise to perform equally well. The dimension sets-- versions A and (B) in the sketch--represent limits within which to build a real antenna. The most critical dimension is the gap between the driver and the reflector, with a required limit to variations of less than 1/4". Notice that, despite slight changes in the side-to-side and the front-to- back dimensions, the driver and reflector overall lengths remain relatively constant. Hence, it is desirable to set the element pieces to the correct length as the first act in building.
I selected 3/16" aluminum rod initially because I had some on hand from another project. However, for full band coverage with maximal front-to- back values, 3/16" rod (about 4 mm) is necessary.
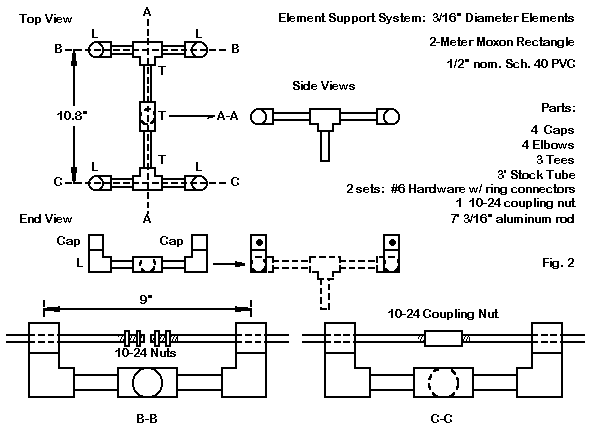
The antenna and support details appear in Fig. 2. Looking at details B-B and C-C, we can see the plan of assembly and feeding. The antenna will consist of 4 rods, each threaded to 10-24 on one end. The driver will have pairs of 10-24 stainless or aluminum nuts to hold terminal rings from the feedline. The reflector half-elements will join in a stainless steel coupling nut (a short piece threaded all the way through). You can purchase these or make one from a small piece of 1/2" by 1/2" aluminum stock. Simply drill though the piece from end to end and tap the required 10-24 threading.
My favorite antenna support material is Schedule 40 PVC. As frequency increases, I like to minimize contact with the material. It would appear that Schedule 40 PVC varies in exact composition from one part of the US to another. In some places, UV retardants are effective, while in others, they are either ineffective or non-existent. Likewise, RF characteristics may vary from one manufacturer to another. By minimizing contact with the elements, any RF deficiencies in the PVC have little or no effect on the antenna.
In Fig. 2, you can see the scheme I used. 1/2" nominal PVC is glues into a T, with elbows pointing upward in the sketch. The elements pass through end caps. These caps and the pipe stubs necessary to cement them to the elbows permit the use of set screws that pass through threaded holes in the double thickness of PVC. With threading that deep, set screws work well, although other methods can be used to ensure that the element do not move. One system that also works is to use short pieces of plastic tubing over the rods between the PVC supports and the nuts.
Fig. 2 also shows a center Tee fitting for connection to a mast. This fitting is optional and would be suited more to the horizontal use of the antenna. Lets look at the alternative I actually used in Fig. 3.
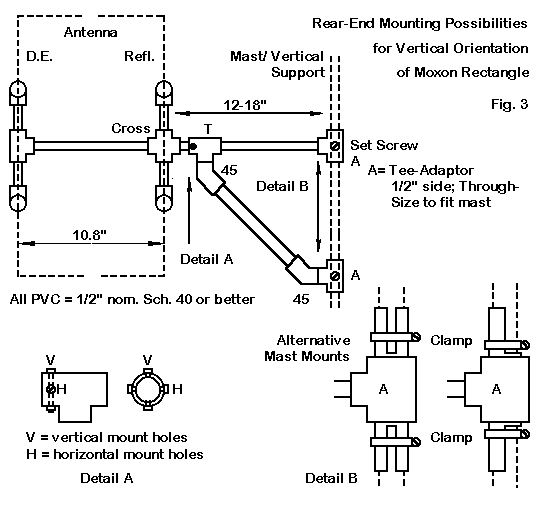
When vertically orienting the Moxon, a rear support system is very useful. We can make one up out of more PVC fittings and pipe. For my test antenna, I used a single PVC pipe section between elements, with the reflector center point holding a 4-way cross fitting. Another pipe stub proceeds rearward and friction fits into the Tee in the support. I drilled two sets of holes through the stub so that I could change the antenna's orientation from vertical to horizontal and back by removing only a single bolt.
The support consists of a straight section and an angular section, forming a strong triangle. The terminating sections are 1.25" to 1/2" adapters sections. The antenna support pipes fit into the 1/2" side ports, while the 1.25" through sections receive piping of the same size to fit over a standard TV mast. Clamps mounts are shown, although one might also use set screws. The space between the upper and lower adapters can consist of the short clamps pipe sections shown, or the space can be filled with a single section of 1.25" nominal PVC. The resulting structure has a bit of flexibleness, but stands up to abuse very well.
One of the keys to building a good PVC structure is to be prepared in advance for aligning portions of the structure that must be at right angles or parallel to each other. PVC cement may give you as little as 15 seconds before glued parts become immovable. I have cataloged a number of right- angle junctions in the shop suitable for aligning PVC pieces. Among them are legs and other supports for the work bench. If a Tee or an elbow requires fitting, I usually put a scrap of pipe dry into the open end. The longer section makes alignment much easier than a junction stub. I simply glue the junction in question and then press it against my sturdy preformed angle.
For the element mountings in their caps, I first cemented the junction pipe stubs in the caps. (These stubs will be glued into the elbows later.) Then I drilled the caps and stubs together. A drill press makes easy work of centering the holes on both sides of each cap. Next, I pushed each pair of caps over a scrap of 3/16" diameter rod to keep them aligned while cementing each one into its corresponding elbow joint. These and similar techniques simplify making almost any conceivable structure from PVC parts.
Bending rod elements is most simply done with a copper tubing bender, a small device that can be found at most hardware depots. The bender will make a 1" radius bend. 3/16" rod and smaller will easily handle bends of this radius with no noticeable weakening or visible cracks. I first cut each element section to length and mark the point (away from the threaded end) that corresponds to one half the side-to-side width. I place this point in the middle of the 90-degree bend. This technique has yielded results identical to those predicted by models using sharp corners.
Some Alternative Mounting Structures
The cradle shown in Fig. 2 and Fig. 3 can be modified for other materials. For example, the Moxon can be made from aluminum strap or flat stock easily obtained from hardware depots. The only change required in the construction techniques shown so far is to replace the cap holes through which the rods pass. In their place, cut slots in each cap to a depth of at least 2/3 the width of the aluminum flat stock used. 1" wide by 1/16" thick stock makes a good assembly, and set screws will hold the pieces in place, especially if the flat stock is tapped for the set screw thread. In addition, flat stock can be bent into tighter radius corners. (However, be sure there is at least a small radius--perhaps 1/8"--to prevent the stock from cracking.)
For this version of the antenna, the overall side-to-side width should be about 28.2" or a bit shorter than the rod model. The front-to-back overall width should be about 13.2" with a 2" gap to separate 4.4" driver tails and 6.8" reflector tails. The wider gap emerges from the greater surface area between ends. However, widening the gap requires alteration to the other dimensions to achieve a 50-Ohm feedpoint impedance. The strap alternative shows a marginally higher gain (about 0.1 to 0.2 dB) due to the slightly squarer rectangle that emerges. In addition, it also shows a lower reactance swing across the band (+/- 6 Ohms, compared to +/- 10 Ohms for the round elements), resulting in a slightly shallower SWR curve.
Rod elements can be used in a simplified structure composed of 3/4" nominal Schedule 40 PVC, as shown in Fig. 4.

A single boom holds this version of the Moxon together. The sketch shows both a Tee for balanced horizontal mounting and a coupler for rear mounting suitable for vertical or horizontal orientations. The front cap is simply a brace to prevent the slow distortion of the boom from the weight of the driver, which passes through the tube. Note the hole in the boom for passing the feedline from inside the boom to the external world.
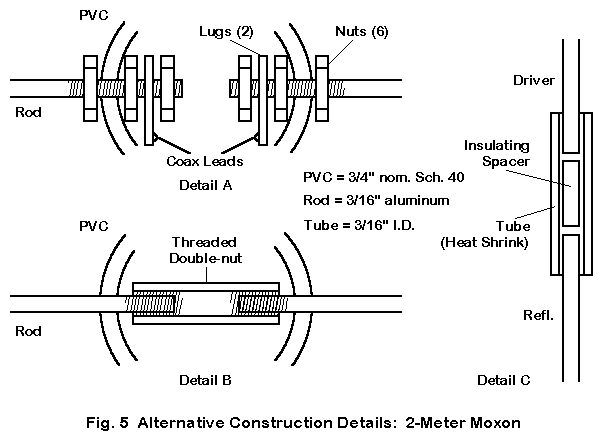
Fig. 5 shows some of the mounting details. As in the initial version of the antenna, the 4 rod element sections are threaded (10-24) on one end. The driver is pinned to the walls of the boom tube by inside and outside nuts, while another set of nuts secures the ring terminals from the feed line. A coupling nut holds the reflector ends together. Be sure these are screwed in place before securing the open ends of the tails in thjeir final alignment, since turning the coupling nut will simply loosen one end while the other one tightens.
Once the tail gaps are adjusted, they can be secured by a length of tight- fitting tubing and a spacer, as shown in Fig. 5. To keep an air gap between the ends, you can omit the spacer and use heat shrink tubing. I usually use a double thickness of tubing, shrinking them one at a time. The outer piece is a bit longer than the inner piece, to cover the inner piece ends. Of course, a rigid piece of plastic tubing with set screws that set into dimples in the tail ends would work as well.
However, be certain that spacer material you use is RF-inert at 2-meters. Some plastics may conduct sufficiently to change the coupling at the ends. If sufficiently conductive, the tubing or other spacer can seriously affect antenna performance.
The variations on these techniques are without end. However, these few will provide a basis for some creative use of adapted materials that you may have available.
Adjustments and Tests
The first task after placing all of the Moxon element pieces in their PVC holders and attaching the feedline is to adjust and temporarily lock the gaps between element ends. The first rod Moxon showed a 50-Ohm resonance at about 145.5 MHz, just about where the design placed it. The SWR curve over the 2-meter band was too close to the modeled curve to need retracing.
It is usually dangerous to assume that, because an antenna is tuned to provide a good match for the feedline, it will also show the modeled gain and front-to-back ratio. However, in this case, the antenna geometry that determines the source impedance also determines the pattern shape. Since the elements were uniform in diameter, there was no reason to expect any performance surprises. Therefore, I locked the assembly tight and moved on to performance tests.
The Knoxville, TN, area has repeaters from close to 145 MHz up to nearly 148 MHz. All of them are easily accessed and heard at full quieting from my location with only a low elevation ground-plane vertical. In fact, a telescoping whip on my hand-helds will access all of our main repeaters. On a 15' mast, the Moxon made telephone copy of all of the repeaters when the antenna pointed anywhere near the forward direction to them. A distant repeater that I hear poorly on a vertical was now full quieting. The Moxon's gain can make a difference for signals at the FM threshold.
When the antenna faced away from the repeaters, only 1 of 6 that I checked could still be heard, and then at far less than full quieting. I could not access any of the repeaters with 5 watts of power--the limit of my gear.
I repeated the test using two hand-helds on simplex across the FM portion of the band. Differences in the patterns at the band edges and at the design frequency were not especially detectable at distances of a quarter mile. Face forward, communications was easy and full quieting. With the antenna pointed in the other direction, communications was virtually impossible. More power at one or the other end of the line might have broken through, but that can be said for almost any system.
The proto-type vertical rod Moxon has proven a very effective antenna at blocking unwanted signals from the rear. I fully suspect that it would be effective in limiting reflected signals from rearward objects because so little signal is radiated in that direction.
There are many ways to construct the Moxon for VHF use. The sample shown here is only one of them. For an alternative construction method, with many useful additional notes on the design, see "A Compact Two-Element, 2-Meter Beam" by Lee Lumpkin, KB8WEV, and Bob Cerrito, WA1FXT. The article appeared in the January, 2000, QST, pp. 60-63. Their version used #10 AWG wire, which is just over 0.1" in diameter.
The Moxon can be scaled for 220 or 440 MHz use--so long as one remembers also to rescale the element diameter or to make appropriate adjustments in dimensions if a scaled element cannot be used. The thinner the wire relative to the original, the smaller the gap; the fatter the element, the wide the gap. And other dimensions will also alter slightly to obtain the maximum null at the new design frequency, with the resonant point slightly lower to obtain full operational coverage of a band or the subsection of interest.
Updated 10-22-99, 11-1-99, 12-18-99. © L. B. Cebik, W4RNL. A version of this item originally appeared in AntenneX, September, 1999. Data may be used for personal purposes, but may not be reproduced for publication in print or any other medium without permission of the author.