 No. 6 The Simplest 2-Element Yagi?
Building a beam is not as difficult as it may seem. Of course, a many- element, multi-band Yagi is an advanced exercise in design and construction. However, a 2-element Yagi for 10 meters is entirely manageable for the novice builder. Parts are available from almost any large home supply warehouse. About $50 for all new materials will produce a very usable beam. Mast and rotator, of course, are extra, but a TV rotator and well-guyed mast will easily support a 10-meter 2-element Yagi.
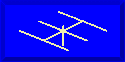
Fig. 1 shows the general outline of one of two forms of a 2-element Yagi. Some designs use a driven element and a director. The design in Fig. 1 uses a driven element and a reflector. The circle across the Y-axis line (the direction of forward gain) indicates the feedpoint.

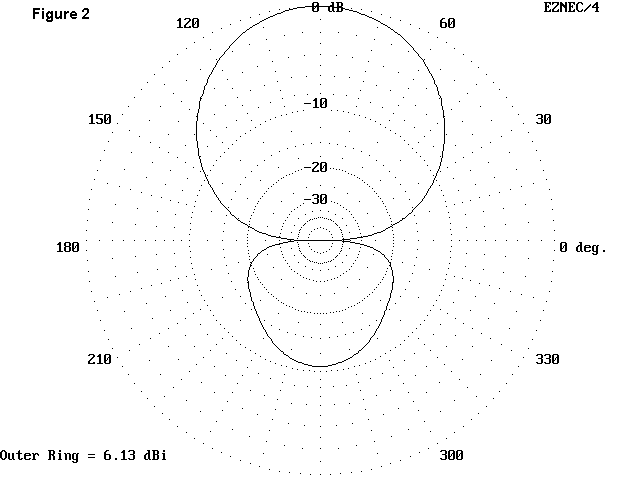
In the December, 1990, issue of CQ, Bill Orr, W6SAI, presented "A Compact 2-Element Yagi for 10 Meters" (pp. 83-84). His design used a combination of 1" and 7/8" diameter aluminum tubing, along with a gamma match for the 30-ohm feedpoint impedance. His beam was remarkably well-behaved. The gain varied from 6.86 dBi down to 6.08 dBi from 28 to 29 MHz, while the front-to-back ratio varied from a low of 9.09 dB to a peak of 11.29 dB. The beam was 17.5' at its widest with the elements separated 4.25'. Fig. 2 shows the beam's pattern at the design center frequency (28.5 MHz). It offers neither the highest gain nor the highest front-to-back ratio obtainable with two elements, but it gives consistent performance over a wide bandwidth.
It is possible to simplify Orr's construction, using either 1" or 0.75" diameter tubing available from hardware outlets. Moreover, by separating the elements 6', the feedpoint impedance increases to 50 ohms, allowing direct feed (with a 1:1 balun).
In fact, with 6' element separation and the dimensions shown below, SWR is less than 1.5:1 across the first MHz of 10 meters. We do lose some gain and front-to-back ratio, but less than 0.5 dB in each case, and the front- to-back ratio is more consistent across the band, never dropping below 10 dB.
The dimensions for the elements are as follows:
1" diameter aluminum tubing, 6' element separation:
  Driven element:  15.9' (±7.95')  Reflector:  17.52' (±8.76')
0.75" diameter aluminum tubing, 6' element separation:
  Driven element:  15.98' (±7.99')  Reflector:  17.5' (±8.75')
The driven element must be split at the center and fed like a standard dipole. To accommodate this, I mounted both elements on scrap plywood plates 3/8" thick, about 24" long and about 6" wide. Varnish or (better) fiberglass epoxy the plywood for weather protection. A pair of #10 stainless steel nuts and bolts (with both flat and lock washers) mount each half element to the plate. The bolts at the center make a good attachment point for a balun or for a coax connector to mate with another on a balun. Small U-bolts can be used for the outer fasteners.
The reflector is longer than a pair of 8' aluminum tubes. I used a 1.5' long piece of tubing as the center for my 1" diameter version of the reflector. Inside was a 3' section of 7/8" diameter tubing that supported the 8' lengths of reflector tubing. The #10 hardware at the center goes through the center 1" tube, while the outer #10 hardware goes through (or around, if U-bolts) the 8' extensions. All the #10 hardware goes through the 7/8" tube. Additional sheet metal screws (also stainless steel) clamp the extension tubes to the inner tube at its ends, cutting down on vibration.
For a boom, I used a 6.5' section of Schedule 40 PVC, 1.25" nominal diameter. A pair of 1.5" U-bolts holds each plate to the boom. Thick PVC tubing works well up to about this length, but much longer might produce too much sag. The plates go under the boom, and the elements are below the plates. Connections to the center of the driven element go to an extra set of lock washers and nuts on the element mounting hardware. The balun and coax are then taped to the boom and mast.
There are very few cautions to give for this beam. Check dimensions. Be sure all metal-to-metal contact is very good. Use stainless steel hardware to avoid rust or using protective spray sealers that work their way between contact points. (However, use flexible coax sealer over any screw-type coax connection.) As with any beam, check both mechanical and electrical connections every few months and after any severe storms.
Although the beam will perform well from a 20' mast, a 35' mast (or higher,
of course) is even better. Expect some gain, almost 2 S-units of front-to-
back ratio, and excellent rejection of signals off the side. This beam
will not open 10 meters during the sunspot null, but it may let you work
some of the weak backscatter signals on the band. In addition, it is
useful in nets, since you can still hear locals off the rear while aimed at
weaker signals. For versatility, the 2-element Yagi will certainly beat a
fixed wire dipole hands down.
Updated 3-17-97. © L. B. Cebik, W4RNL. Data may be used for personal purposes, but may not be reproduced for publication in print or any other medium without permission of the author.