We can teach ourselves much about antennas if we learn to do some systematic modeling. What "systematic modeling" means is best told by way of an example. We can think of it as a model of modeling. It is adaptable to any number situations in which we want to maximize our knowledge and understanding in order to make intelligent decisions about antenna construction options. In this instance, however, we shall focus on the loads we have learned to use.

To make the task more specific, let's use 7 MHz as our target frequency region. The element will be aluminum. For study purposes, we can set a diameter of 1" as being about midway between beefy construction and wire construction. The exact dimensions may differ if we choose a different materials, but the trends will all hold true.
The best way to begin the task is by modeling a 1/4 wl vertical antenna above and in contact with perfect ground. Use about 25 segments, feeding the antenna in the segment closest to ground (in NEC) or at the ground pulse (in MININEC). Adjust the length to resonance. With NEC (from which all of the following numbers were derived), you should obtain from an elevation plot a gain of about 5.14 dBi with a source impedance of about 35.97 Ohms for a 33.7' vertical. Exact numbers will vary from program to program, but they should be very close to these. We shall assume that all cases of resonating an antenna bring the source impedance to less than +/- 1 Ohm of reactance.
Even if we plan to use a dipole element, modeling over perfect ground is useful and reliable. Although a real vertical over imperfect ground will show a different gain, the trends derived from our perfect ground model will be accurate. Moreover, a vertical over perfect ground also provides data for a dipole in free space. Simply subtract 3 dB from the gain and double the source impedance. A test 67.4' free space dipole with 51 segments (to place the source at exact center in NEC) yields a gain of 2.13 dBi and an impedance of 71.87 Ohms. From the free space dipole, we can then adjust results for dipole elements over real ground.
So, we shall save half the time it takes to create and modify both the antenna geometry and the load placement simply by modeling the situation over perfect ground with a ground-mounted vertical.

The graph in Figure 2 shows what happens for our 7 MHz vertical--and for any other 1/4 wl vertical, as well as for any free space dipole. The gain begins to drop from its peak of 5.14 dBi down to 4.69 dBi at the 10% of original length mark (3.4'). Equally notable is the drop in feedpoint impedance from nearly 36 Ohms down to a fraction of an Ohm. As the resistance at the source drops, the capacitive reactance rises from zero for the full length antenna to over 1400 Ohms for the antenna that is only 10% of that length.
At this point, we must make some study decisions. Ideally, we should explore loading with every length of antenna. Since we do not have room for that ideal in this column, I shall choose a particular antenna length to explore: about 70% of full length. In fact the antenna is 23.4' long--of course, using the same 1" diameter aluminum we started with. With no load, this antenna shows a gain of 4.93 dBi, only about 0.2 dB down from the full size antenna, but with a source impedance of 13.49-j176.3 Ohms.
The capacitive reactance tells us what compensating value of inductive reactance a base loading coil must have to resonate the antenna: 176.3 Ohms (just about 4.008 microHenrys at 7 MHz). However, if we want to look at options for loading the element at other than the base (or, with double the reactance and inductance values, at the center of a dipole), we must look systematically at what values of reactance will do the job. For this task, we can specify a type 4 (complex impedance) load consisting of a resistance and series reactance, and initially set the resistance to zero. (We shall change that zero later.)
So let's move the load from the antenna base (segment 1 in NEC, or the 2% mark for a 25-segment antenna). We shall for space economy move the load successively to segments 5, 10, 15, 20, and 25 (18, 38, 58, 78, and 98% up the antenna). Then we shall adjust the amount of reactance to bring the antenna to resonance.
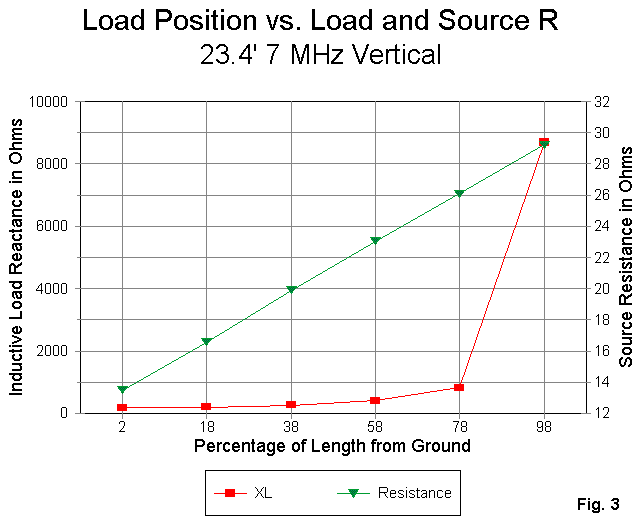
The graph in Figure 3 shows part of the results of our work. The source resistance climbs steadily from its low of 13.49 Ohms up to 29.21 Ohms with the load very near the tip of the antenna element. However, note the curve for the required value of inductive reactance. Near the element tip. the required reactance is 8680 Ohms, or a seeming inductance of 0.197 milliHenrys. The real antenna would be resonant just from added wire length in the solenoid long before that high an inductance was reached.
There is a reason for this situation. NEC loads are pure (mathematical) reactances and not physical coils. In the classic relationships between reactance and inductance, a coil with equal input and output current is assumed. However, on an antenna, the coil replaces a section of linear antenna element. On that "missing" piece of antenna, the standing current magnitude changes so that the input and output currents levels are not equal. The differential is an indicator of how much a real coil radiates and to the same degree acts as a length of wire rather than a solenoid.
The further out the antenna you move, the greater the current level change per unit length. A center loading coil shows far less than 1% change and hence acts strictly as an inductance. At the tip, the coil acts almost exclusively as a length of wire and very little as an inductance.
In addition to the declining effectiveness of coils as inductive reactances as you move away from the source, the required reactance for resonance increases. At the 58% point, the necessary reactance is over double that required at the source. Expressed in other terms, for a dipole, each mid-element loading coil must be as big (in reactance and inductance) as a single center loading coil. For our antenna, a loading coil mounted exactly half way up the element must have 330 Ohms reactance compared to a base loading coil of 176.3 Ohms.
However, as the load moves outward along the element, two advantageous things happen. The source resistance rises--from 13.49 Ohms for a base loading coil to 21.79 Ohms for a mid-element loading coil. This rise in source resistance has implications for the ease of matching the antenna to common feedlines. (Remember to double these values if you are thinking of a dipole.) Second, the antenna gain rises slowly as the load moves outward, from 4.93 dBi with a base load to 5.02 dBi with our impractical load near the tip. With the load exactly mid-element, the gain is 4.95 dBi, which is not a significant difference from the gain of the antenna with a base load.
Again, it would be useful to know the effect of Q on loads for every antenna length possible and at every load position along each of the antennas. However, for this example, let's stick with our 23.4' long vertical (corresponding to a 46.8' dipole) and explore the effects of Q upon just the base load and the mid-element load models.
The first question is this: what is a sensible range of Q to explore? It is certainly feasible to construct a loading coil with a sustainable Q of at least 100. ("Sustainable Q" means the Q after the coil has been immersed for months or years in the chemical soup that we call our atmosphere.) At the other extreme, the highest coil Q I have seen claimed for an antenna loading coil is about 600. Whether or not such a high value is actually feasible or sustainable in use, I cannot say, but exploring the Q-range from 600 down to 100 should be instructive.
Therefore, in two sets of modeling runs, let's explore what happens to the antenna with base loading and with mid-element loading as we vary the Q. We can do this by simply using the Type 4 load we have been using for reactance insertion and adding a series resistance appropriate to the Q. Since the reactance value of the mid-element load is over double that of the base load, you will have to expect resistance values to parallel that ratio for equivalent Q values.

The graph in Figure 4 shows the effects of decreasing Q on the antenna gain. From a value of 600 down to a value of 300, the loss is slight. However, from that Q value downward, the curve gets increasingly steep. As the Q of the base load decreases, the resistance of the coil shows up as an increase in source resistance. The increase is in the range of 0.3 Ohms at Q=600 to 1.75 Ohms for Q= 100.

The results for mid-element loading appear in Figure 5. The curve is virtually identical to that for base loading. Once more, a Q of 300 seems to be the dividing point between modest losses and more extreme losses with mid-element loading coils. Because the coil is further out, the source resistance changes only by about the same amount as it does with a base loading coil, although the series resistances are more than double. The source resistance with a Q of 100 is about 2.5 Ohms higher than it is with an infinite Q.
Throughout the range of Q values for both the base loading and the mid- element loading models, the difference in gain between the models is never greater than about 0.3 dB. This very slight difference belies some common recommendations often heard that give mid-element loading grandiosely higher marks than base loading. We have a case here of remarks being taken out of their original context and becoming unwarrantedly general. Nothing in the physics of a loaded antenna warrants them.
The recommendation for mid-element loading arose from very short mobile antenna practice. In this situation, the antenna must contend with significant amounts of auto body metal and other surrounding objects to absorb or reflect in uncontrolled ways the radiation from the antenna. If the advice has any application, it is not to the general theory of loaded antennas, but to antennas located where external conditions affect their performance. For any given Q, there is no significant difference in the anticipated performance of base loaded or mid-element loaded antennas that are free and clear of such clutter.
To check the operating bandwidth of the antennas, we must change the type of load to a type 0 load having a series resistance, inductance, and capacitance (the last of which we set to zero to show that it is missing). The resistance-inductance combination for the base-loaded antenna is .5877 Ohms and 4.008E-6 Henrys. For the mid-element loaded model, the combination is 1.1 Ohms and 7.503E-6 Henrys. This change in load type ensures that the antennas will show the correct complex impedance at every frequency.
We may make a frequency check every 100 kHz for two increments above and below the resonant frequency to ensure that we cover the width of the 40-meter ham band. Here are the results from my NEC run.
Base-loaded model:  R = 0.5877 Ohms; L= 4.008E6 H
Frequency      Gain      Source Impedance    VSWR
relative to     dBi         R+/- jX Ohms     relative to
Resonance                                    14.08 Ohms
-0.2 MHz       4.72      13.16 - j 18.83     3.645
-0.1           4.73      13.61 - j  9.36     1.944
 0             4.75      14.08 - j  0.01     1.001
+0.1           4.76      14.56 + j  9.22     1.886
+0.2           4.77      15.05 + j 18.37     3.293

Mid-element-loaded model:  R = 1.10 Ohms; L= 7.503E6 H
Frequency      Gain      Source Impedance    VSWR
relative to     dBi         R+/- jX Ohms     relative to
Resonance                                    22.68 Ohms
-0.2 MHz       4.76      20.30 - j 28.17     3.446
-0.1           4.77      21.45 - j 14.43     1.907
 0             4.78      22.68 - j  0.42     1.019
+0.1           4.79      24.00 + j 13.88     1.802
+0.2           4.80      25.43 + j 28.55     3.104

Figure 6 graphs the SWR curves relative to the resonant impedance of each antenna. Although the SWR operating bandwidth of the mid-element loaded model is slightly wider than that of the base-loaded model, the difference is unlikely to make a difference in operation. Both antennas have 2:1 operating bandwidths in the vicinity of 200 kHz, or less than the span of the 40-meter band.
The operating bandwidths, of course, are those at the antenna source terminals. The application of matching systems and losses in the feedline may make these bandwidths appear wider by virtue of taking SWR readings at the transmitter location. For our purposes, it is an open question whether that widening of the operating bandwidth comes with a low or high cost in losses.
The tabular data shows as a graph cannot the changes in both the resistance and the reactance at the feedpoint of the respective antennas. The ratios in the source resistances of the two antennas is reflected also in the total change in reactance across the checked bandwidth. Hence, the SWR curves turn out to be very similar.
Interestingly, the key significant difference in the two loading systems appears to be the source resistance. For most purposes, the higher source resistance of mid-element loading would yield higher efficiency with the same set of external losses due to such things as connection resistance and the like. Other variables, such as construction advantages of one system over the other, fall outside what modeling can indicate. However, we have not modeled our last load with our 23.4' vertical over perfect ground.
A capacity hat is an wholly symmetrical structure added to an element end at right angles to the main element. The symmetry ensures cancellation of any radiation from the structure. The name "capacity" hat arose from a method of calculating the size of the hat, a method which is useful at low and medium frequencies, but which grows increasingly inaccurate throughout the HF range. Physically, the hat is simply an extension of the antenna element that does not produce significant radiation.

Figure 7 shows the general scheme, along with several hat types. The square, hexagon, and octagon shown all have a perimeter wire, which reduces the required size of the support spokes. However, hats can be composed solely of spokes (a few or many), can have intermediate as well as perimeter connecting wires, or can even be disks.
There are some rules for creating hats. The thinner the hat wire, the longer the spokes, for any given geometry. The fatter the main element, the longer the spokes.
Any hat that passes the symmetry test will work as well as any other such hat. For example, here are gain and source impedance figures at resonance for 3 hatted 23.4' verticals: a square, a hexagon, and an octagon, all with perimeter wires. As you increase the number of spokes further, the rate of spoke length decrease goes down. Spoke length indicates the distance from the main element outward.
               Square:             Hexagon:            Octagon:
                3.11' spokes        2.78' spokes        2.6' spokes
Gain           5.03 dBi            5.03 dBi            5.03 dBi
Source Z       29.5 - j 0.6        29.7 + j 0.9        29.7 + j 0.9
There are two very notable sets of values in this small table. First, the gain of the antenna is higher than with either system of inductive loading at a Q of 300. The gain is about mid-way between the inductively loaded models and the full length antenna. Second, source impedances at resonance are significantly higher than even those of the mid-element loaded model.

"Capacity"-hat loaded model:  hexagon
Frequency      Gain      Source Impedance    VSWR
relative to     dBi         R+/- jX Ohms     relative to
Resonance                                    22.68 Ohms
-0.2 MHz       5.01      27.26 - j 14.42     1.663
-0.1           5.02      28.44 - j  6.73     1.265
 0             5.03      29.66 + j  0.91     1.031
+0.1           5.04      30.94 + j  8.58     1.330
+0.2           5.05      32.26 + j 16.22     1.690
The chart reveals that the rate of change of reactance across the frequency sweep is the smallest of all three types of loading we have investigated. The tables for the other two types of hats are too close to this one in all values to merit display.
The upshot is this: if mechanical problems do not override performance figures, hat loading deserves serious consideration in the development of shortened antennas.
Loading scheme      Gain      Source         2:1 VSWR
                    dBi       Resistance     Bandwidth
Base:  Q=300        4.75      14.08          <250 khz
Mid-el.:  Q=300     4.78      22.68          <250 khz
"Capacity" hat      5.03      29.67          >500 kHz
Full-size           5.14      35.97          >500 kHz
A more complete study would yield much more data. However, this much is enough to reveal some of the design decisions facing us. Gain, bandwidth, and source impedance form the elements of the final compromise, after adding in all of the external factors to which modeling cannot contribute.
A little aimless modeling every now and then can be entertaining and occasionally useful. However, the more systematic you make your modeling efforts, the more profitable the output and the program become.