

|
|
 |
 |
 |
|
|
Antentop is FREE e-magazine devoted to Antennas and Amateur Radio an
Special page devoted to
Balcony Antenna

Custom Search
|
ANTENTOP-
01- 2005, # 007 |
Balcony Antenna
|
|||||
|
|
||||||
|
|
||||||
|
|
||||||
|
|
by
Harry Lythall - SM0VPO mailto:
sm0vpo@telia.com Credit Line: http://web.telia.com/~u85920178/ |
|||||
|
Many
amateurs are very restricted with the space they have available
for HF antennas. I have documented a short antenna for the HF
bands, but here is a simple method of mounting it, and a method
of further reducing the physical length. I used to use an old
CB (27 MHz) half-wave antenna which had a broken matching coil. this I used
as a 1/4 - wave antenna for 14 MHz, after removing the matching
coil. Today I find that CB antennas have increased in price, so
I have found a cheap replacement that can be fitted to the balcony
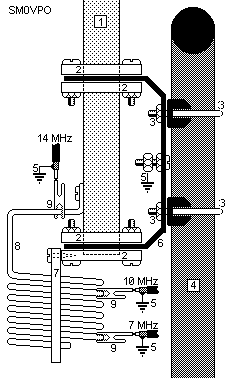
of apartment dwellers. THE ANTENNA Above
is the side view of a bracket, which can be thrown together in
a couple of hours and gives surprisingly results. I use six sections
for the antenna itself, each of which is 1 meter long. Each section
fits inside the previous section by exactly 10 cm. the last section
is adjusted so that total length of the antenna is 5.35 meters. This resonates at 14.1750 MHz.
I used the following aluminum tubes:- |
|
|||||
|
section
section section section section section
6 : 6 mm Dia. Wall thickness = 1.0 mm. (top section) This
is shown as item (1) in the drawing above. |
||||||
|
THE BRACKET (6) & (2) The bracket
screws on to a handrail of the balcony. In my present situation
I have a 7 meter wide terrace with a horizontal handrail, but
there are four vertical steel pipes supporting the handrail. The
bracket is screwed on to one of these vertical supports (4). The
bracket is formed using 3 - 4 mm thick aluminium plate (6) with
a 50 mm hole in the center of the top
& bottom ends. Bend the plate in two places to prevent the
plate becoming weakened. The two ends are each sandwiched in between
two nylon blocks (2). Use a chopping board stolen from the kitchen,
if you can get away with it. Otherwise,
the chopping boards are available from: IKEA ( WOOLWORTHS ( SAFEWAY ( Drill THREE
of the nylon blocks, in the center, to fit the |
31mm tube (1).
The fourth block (bottom) should be drilled with a 5 mm hole to
allow water to run out. The bracket is bolted to the balcony handrail,
using 35 mm exhaust (muffler) clamps (3). THE COIL (7) & (8) This
is used to make the antenna resonate at lower frequencies. I wound
all my coils using 4mm aluminum wire, but copper hydraulic brake
pipe works as well. The coil is 10mm Dia (the same as a tin of
DelMonte pineaple chunks)! The coil pitch is 1cm per turn. I used
two pieces of plastic conduit (7) to support the coil. The
coil uses about 1 meter of wire/pipe for every three turns. Flatten
one end and drill a hole in it for connecting it to the antenna
pole (1). If you use aluminum wire, then shorter pieces can be joined together
with a brass insert from a car cable connector. Copper tube can
easily be soldered. |
|||||
|
|
Page 43 |
|||||
 |
 |
 |
 |
Just for Fun:

Powered byIP2Location.com
Thanks for your time!
Last Updated:
February 11, 2018 23:20

